We will be refreshing and updating the forum over the next few weeks. You can still register and talk sleds...

Lift Kit Install (Part 1)

Talk about the oldies, restore, repair, etc.

Moderators: Old School, harryparatestis

Post Reply
THX_138
Posts: 21
Joined: December 29th, 2007, 12:13 pm

Lift Kit Install (Part 1)

Post by THX_138 »

Here's a step by step of "my" installation of
Dantheman's Kitty Cat lift kit.

An email from Dan before purchase stated this:

"1994-2000 no modifications necessary at all to anything
pre 94 you will need to drill the 2 front skiis to 3/8 holes"

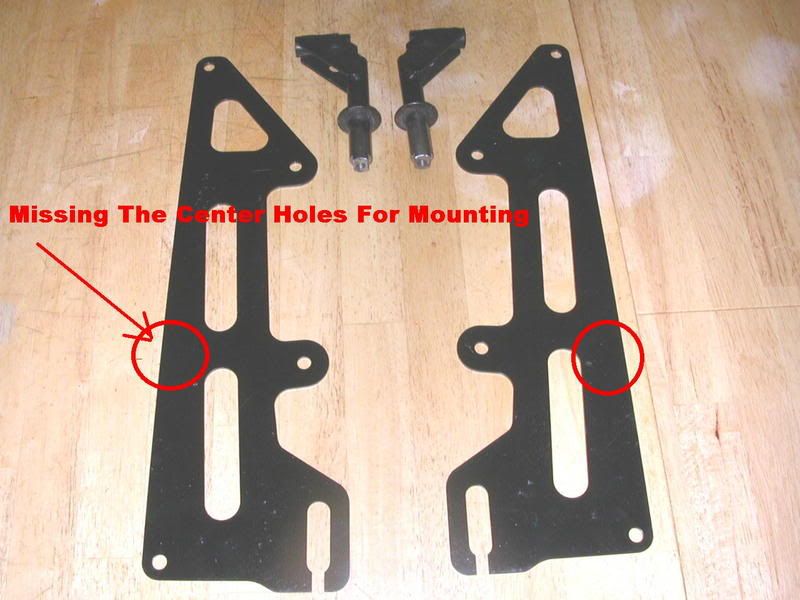
After completing the install, I found nothing needing to be
drilled on the skis, but did find the track lift plates needing 2 holes
drilled for the center mount bolts. In the first picture below is exactly
what comes in the kit delivered to your door


Image

Again this post in no way do I claim ANY responsibilty for
anyone else working on their things... this is just pics of my
install Please use safety when working with any and all tools
and support whatever you are working on correctly and safely


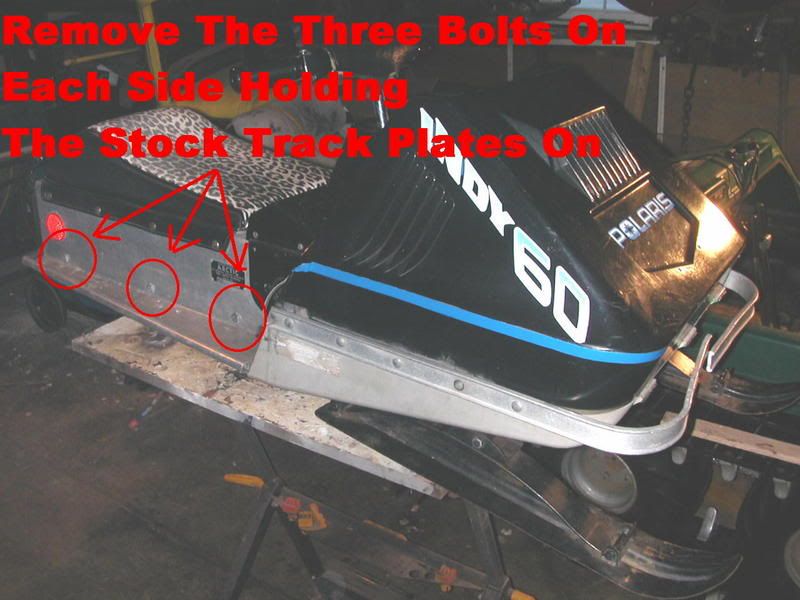
First step I did was to loosen and remove the 6 side bolts
holding the stock track plates on


Image

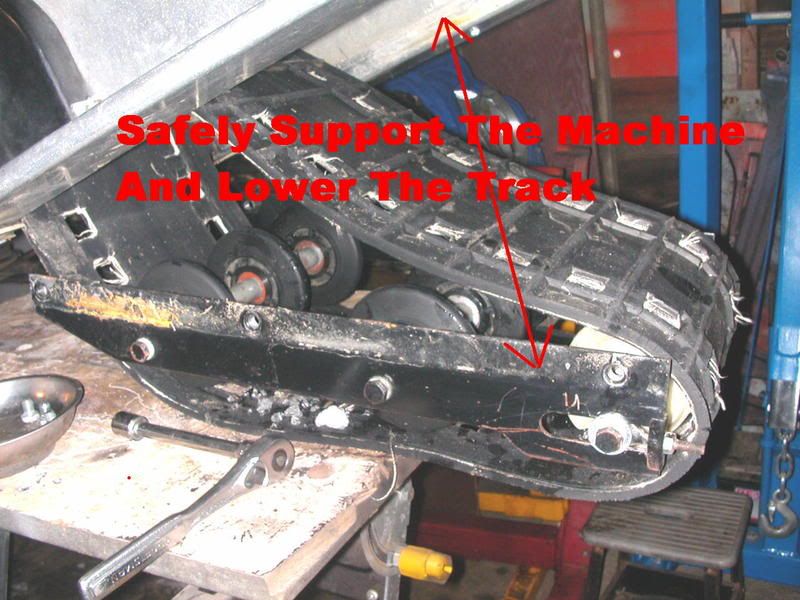
Next I safely and securely raised the rear of sled and lowered
the track assembly


Image

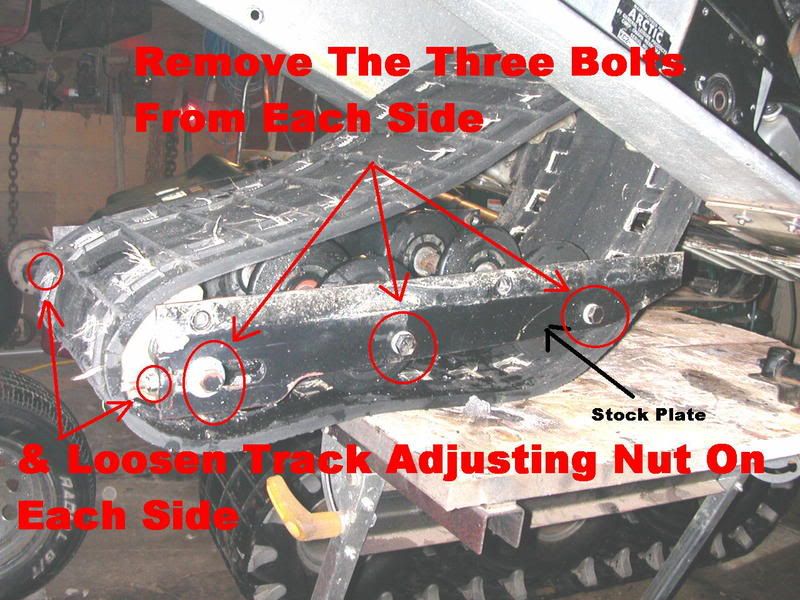
I then loosened the rear track adjusters and the 6 side bolts
that retain the rear cog axle and the 2 bogie wheeled axles


Image

Then I simply reversed previous procedure and
installed the lift kit plates


Image

This is the only thing I found that needed to be
"drilled" on the installation... the center bolt that holds
the track lift plate in


Image

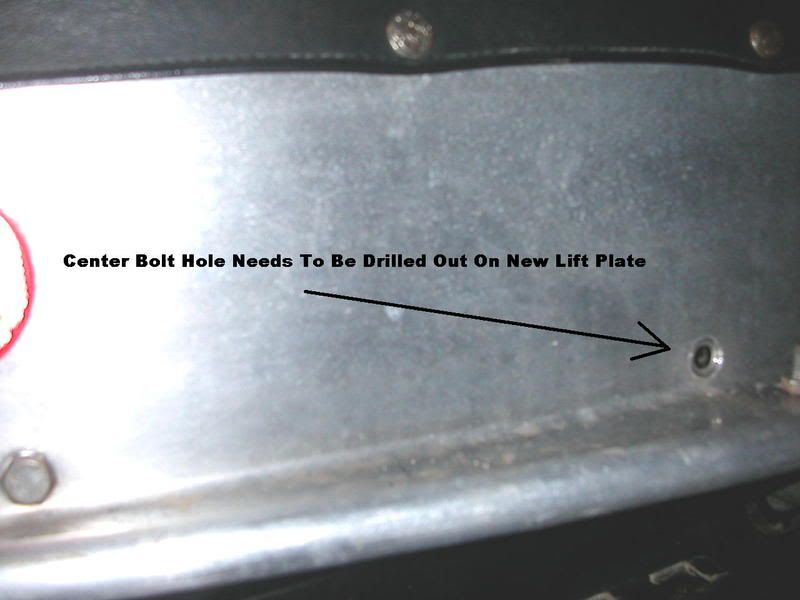
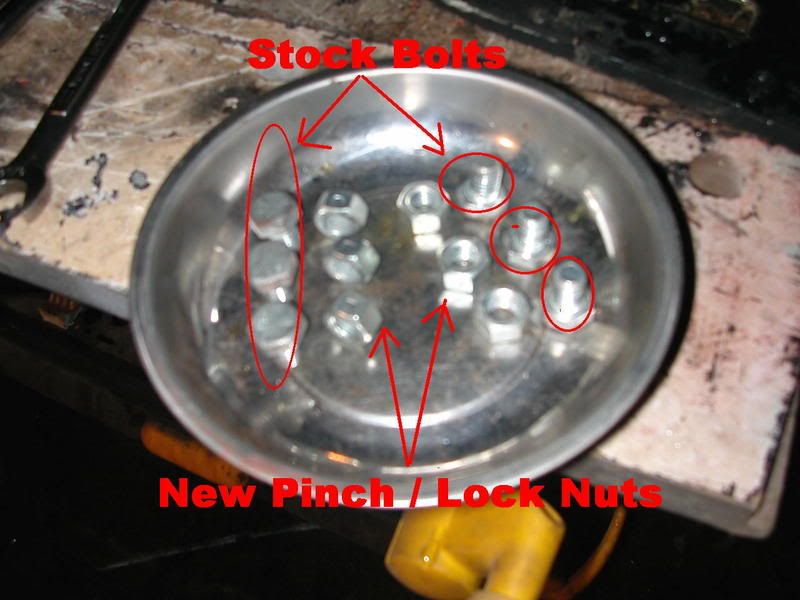
The stock track plate has retaining nuts welded
to the inside of the plate. The new track lift plate does not.
So a quick run to the hardware store for some new lock/pinch
nuts and all was good!


Image

Besides needing to drill the lift plates, another modification the lift kit required was clearancing the
new ski spindle lifts to clear the ski mounts.

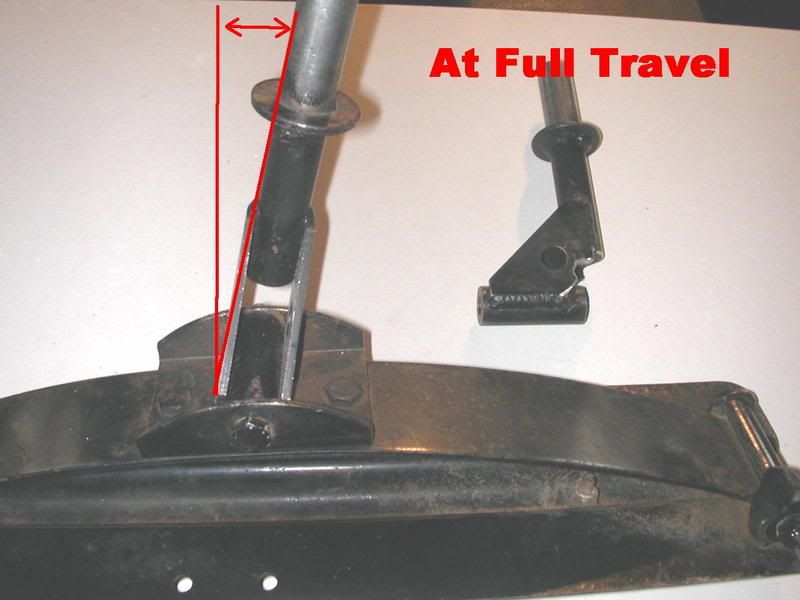
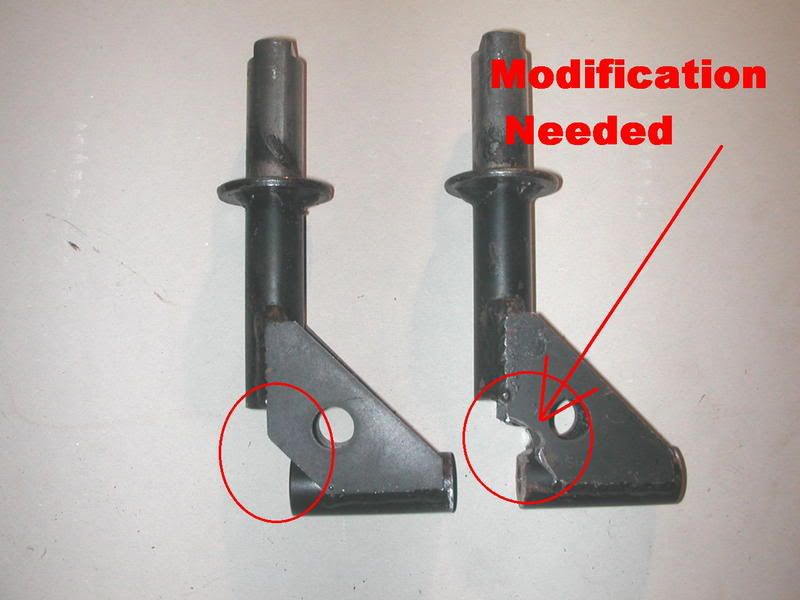
Below is a picture of the new ski spindle lift installed. It is at
full travel and only has about 1/4-1/2 inch of movement
overall. Beside it is a modified spindle


Image

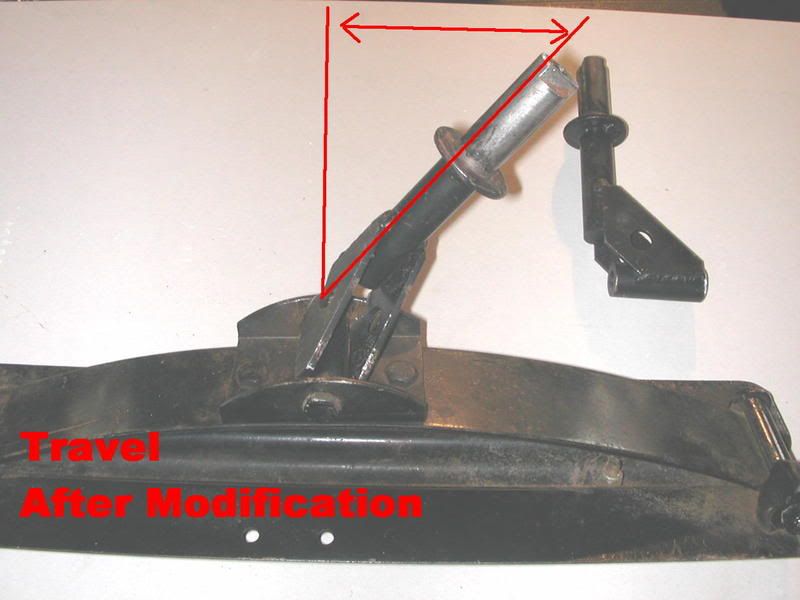
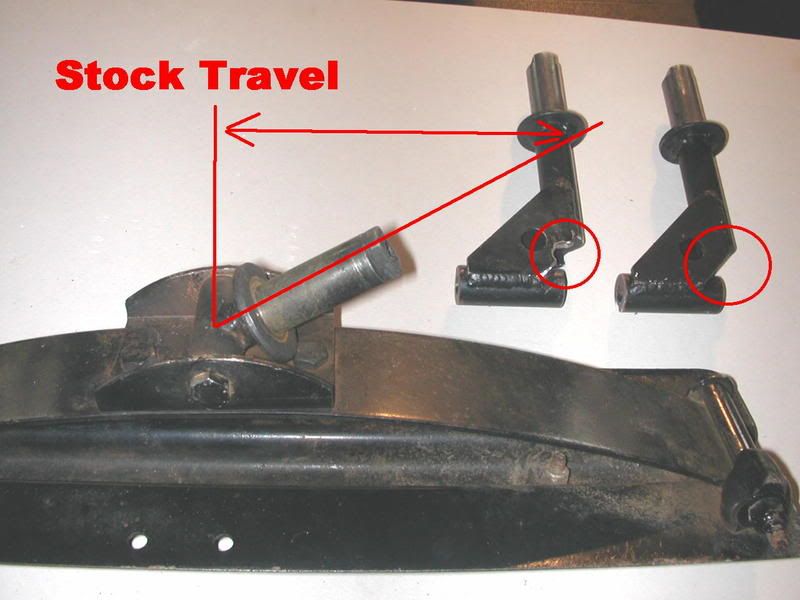
This is a picture of travel after doing the
modification. Beside it is the unmodified spindle


Image

This is the travel of the stock spindle...
notice how much difference in spindle length/height there
is from the stock to Dans after modifying them for movement/travel


Image


This is the modification needed. I ground out a small
area on both sides allowing the new spindle to have some
travel allowing ski to move up and down similar to the stock ones I removed


Image


Lastly... another issue I ran into on the
install was the
threads in the new lifted spindles. While I was disassembling
one side my son was watching and asked if he could start
putting the new spindle in the other side. I happily handed him
the ratchet. Shortly after heard..."Dad, this doesn't turn
anymore". So I look and the bolt is more then 1/2 way out.
I back the bolt out and it looked like he
cross threaded it.....but it wasn't.............

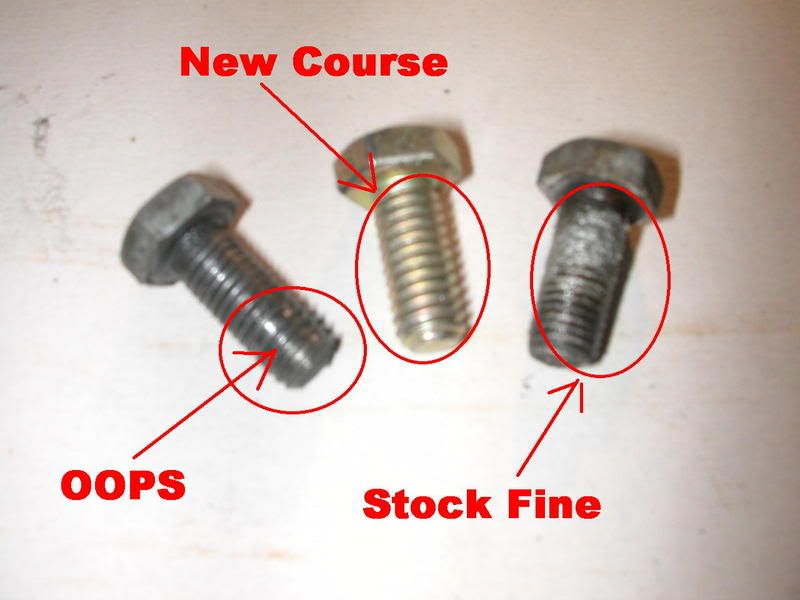
The stock Kitty spindles have FINE threaded bolts
holding the steering assembly on the top of the spindle and
spindle on sled The new lifted spindles are COURSE thread.
So another quick run to the hardware store for some
course thread grade 8 bolts and all was good again!


Image

Will put some installed pictures in a "Part 2" thread
Last edited by THX_138 on March 10th, 2008, 11:18 pm, edited 2 times in total.
kube1
Posts: 22
Joined: January 7th, 2007, 6:30 pm
Location: Edmonton, AB Canada

Post by kube1 »

Dude, maybe a little more time spent modifying your spindles would have resulted in a more professional looking job. I can't belive the way you butchered those after all the effort dantheman put into making them. Oh well.
THX_138
Posts: 21
Joined: December 29th, 2007, 12:13 pm

Post by THX_138 »

kube1 wrote:Dude, maybe a little more time spent modifying your spindles would have resulted in a more professional looking job. I can't belive the way you butchered those after all the effort dantheman put into making them. Oh well.
"Dude"

Maybe if the kit had come to fit the machine like it was
promised I wouldn't have had to "butcher" it like you comment.

Maybe if the kit had come when I ordered it and not a
MONTH later, I wouldn't have been in the garage in below
zero weather having to "butcher" it.

At that point I wasn't worried about looks ......
Nor was I was worried about the fact what I bought didn't
fit.... I was worried about our son enjoying his sled.

Maybe next time I'll call you so you can grind a couple
of meaningless spots so it will work and I won't have to
stand there and curse & swear while doing it and then be
picked apart later by someone with more internet time
on their hands then they know what to do with.

I ain't knockin Dan.... " It is what it is" ... and sometimes
things slip through.... but don't stick your $.02 where it
don't belong.....
kube1
Posts: 22
Joined: January 7th, 2007, 6:30 pm
Location: Edmonton, AB Canada

Post by kube1 »

hey, if you're gonna post pics for everyone on this forum to see then i guess everyone is allowed to give their 2 cents worth. suck it up.
THX_138
Posts: 21
Joined: December 29th, 2007, 12:13 pm

Post by THX_138 »

kube1 wrote:hey, if you're gonna post pics for everyone on this forum to see then i guess everyone is allowed to give their 2 cents worth. suck it up.
Oh yay!..... another keyboard commando

<yawn> :roll:
kube1
Posts: 22
Joined: January 7th, 2007, 6:30 pm
Location: Edmonton, AB Canada

Post by kube1 »

Oh yay!..... another keyboard commando
where'd you dig up that little gem?... your Internet for Dummies handbook?
THX_138
Posts: 21
Joined: December 29th, 2007, 12:13 pm

Post by THX_138 »

kube1 wrote:
Oh yay!..... another keyboard commando
I am ignorant... blah, blah, blah, blah.......

.... get a life
Daddy is going to find out you're on his computer :roll:
Post Reply

Who is online

Users browsing this forum: No registered users and 6 guests