We will be refreshing and updating the forum over the next few weeks. You can still register and talk sleds...

Kitty engine swap

Kitty Cat chat area, almost anything goes but keep it clean and snowmobile related.

Moderators: Old School, harryparatestis

Post Reply
MachJeff
Posts: 79
Joined: September 21st, 2005, 4:08 pm
Location: Mb. Canada

Kitty engine swap

Post by MachJeff »

My original 77 kitty motor burnt the rings, and I couldn't justify putting money into a motor older than me. I also hoped for something a bit more reliable and easy going, especially when the kids are watching me curse at the thing for not starting again.

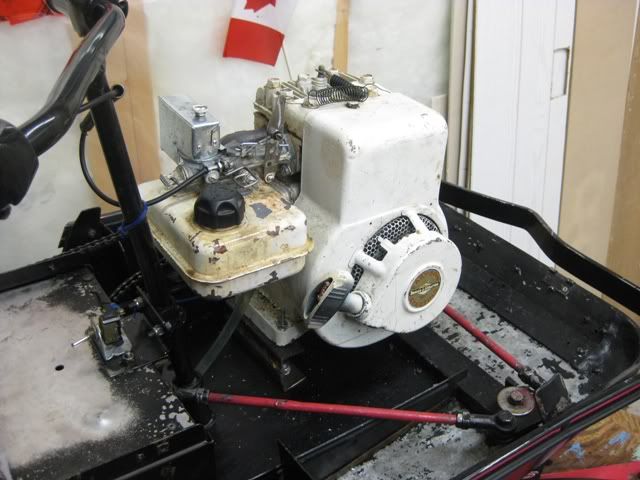
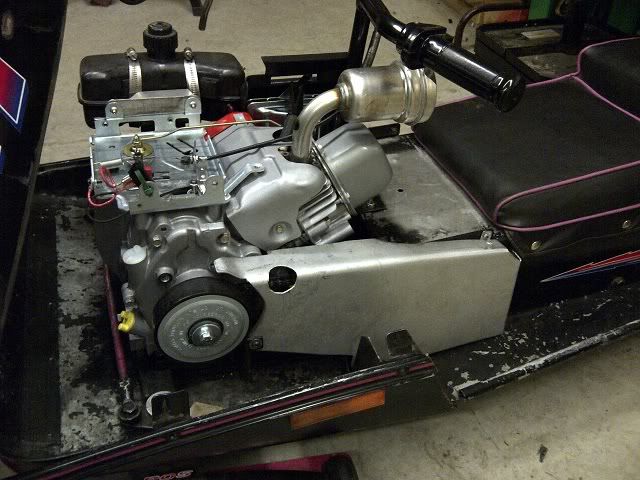
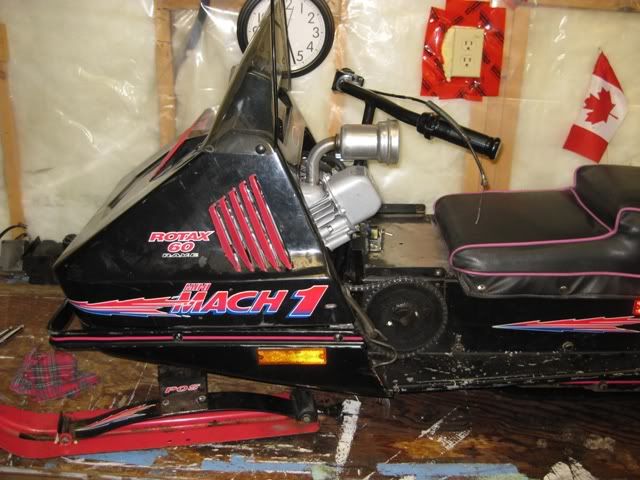
To get by for a while, I tried putting in a small 2hp briggs we had laying around. I knew it was smaller than we wanted, but I used it as practice. I had to bypass the governor, make a throttle linkage, pipe the exhaust, and make a new chain guard.

A couple pictures of the short-lived 2hp kitty;
Showing custom exhaust, and a air box I bent up to keep the kids from getting covered in gas spitting back out of carb
Image
From the other side you can see the throttle linkage
Image[/img]

I can post more pictures of it or more info if anyone has any specific questions. However, it has been pulled out already.
MachJeff
Posts: 79
Joined: September 21st, 2005, 4:08 pm
Location: Mb. Canada

Post by MachJeff »

I would have gone with a 2.5 hp engine if I could have found one, and really would have preffered a 4hp. However, I found a pretty good price on a motor locally, and it really looked like I could make it fit.
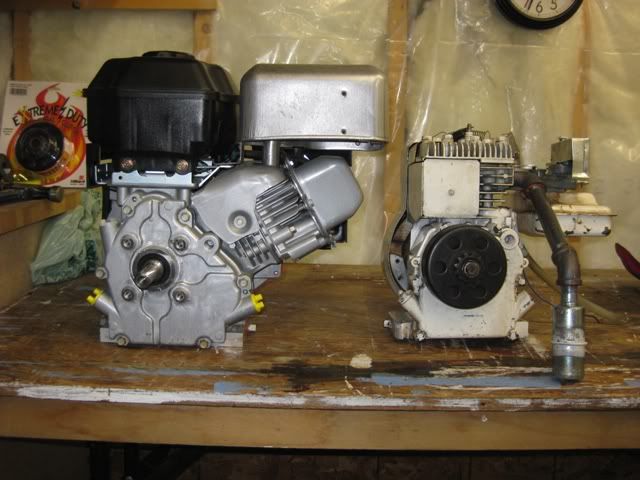
Image

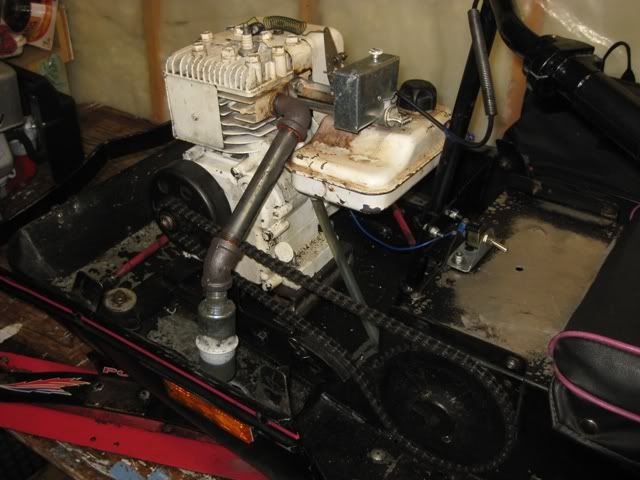
It's a Briggs and Stratton 8hp Intek motor. Pretty stupid, its supposed to be like 250cc. But it looks like it will actually fit.
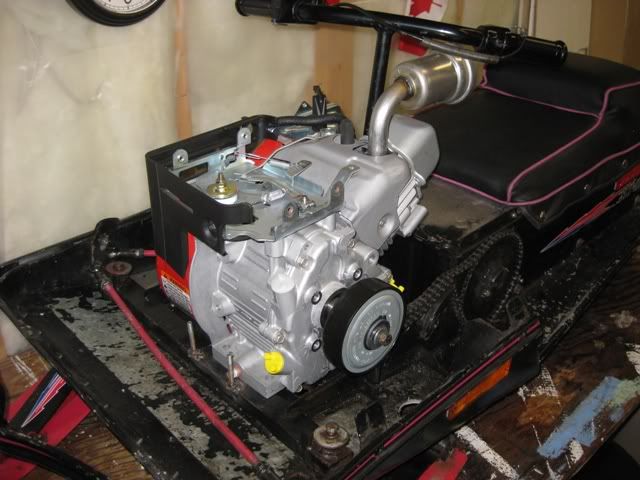
Image

I took the fuel tank off the top so I can get the hood back on.
Image

I'm not looking to make a racer or any rediculous speed. I'll play with the gearing to keep it reasonable for my kids, and will likely keep the govenor in place if it will allow. I just want it to start easy, run smooth, and pull the kids around.

Right now the engine is just sitting loose in place. The next steps are to;
- pick final motor location, I set it as far back as possible so I dont have to mess with the steering arms, but I may move it forward if I can get the exhaust under the hood.
- make motor mount to bolt engine in place
- make a mount for a smaller fuel tank off to the side of the motor under the hood
- connect the throttle - I have not yet figgured out how the linkages are supposed to work on this motor
- the trickiest part for me, make new exhaust piping to get the muffler under the hood and out the bottom of the belly pan. Looks like I will need some heat shielding.

I'm building in on the cheap, mostly with whatever tools and material I already have in the garage. I can grind and weld, but dont have any fancy saws, lathes or pipe benders. Sure could use them now though.

I'm hoping to get it running safe enough for the kids within just over a week before we head out to the cabin for the first time this winter. I'll repost as it progresses.
72
Posts: 272
Joined: January 23rd, 2008, 3:11 am
Location: Ohio

Post by 72 »

That should be able to climb up a side of a mountain.
929rog
Posts: 42
Joined: November 4th, 2011, 11:52 am
Location: So. Maine

Post by 929rog »

Yup it will work. Is that motor a 1 inch shaft?? Probably going to need to use a fuel pump and get plenty of header wrap for the pipe you make so they dont get burned. Sweet
929rog
Posts: 42
Joined: November 4th, 2011, 11:52 am
Location: So. Maine

Post by 929rog »

check affordablegokarts.com they have pictures of throttle set ups.
MachJeff
Posts: 79
Joined: September 21st, 2005, 4:08 pm
Location: Mb. Canada

Post by MachJeff »

Got it mostly all together yesterday. With the tall gear I have in it now and if I put on a new track, it very well may climb a mountain - lots of torque. This motor has a 3/4" output shaft so clutches are readily available. Affordable go carts was a good resource.

Still have to get some pipe and fab a new exhaust. I ended up getting rid of the entire governor, inside and out. I need to put a limiter on it to keep the thottle from opening all the way - at least untill I upgrade the valvetrain. Made a throtle linkage that has some adjustability to it. I would like to make a cover for the throttle area to clean-up the look a bit. Gas tank is mounted off to the side so the hood closes, but is still gravity feed.

I need to tighten the track to get a better test ride as it was ratcheting a lot. But it starts and idles beautiful, and will be plenty quick.

Image
929rog
Posts: 42
Joined: November 4th, 2011, 11:52 am
Location: So. Maine

Post by 929rog »

looks sweet. A buddy of mine did a big motor swap and had his pipe come out up front of the cross member. I wish I could draw on your picture. just went to a shop and had them bent 2 pieces of pipe as tight as they could then custom fit it. Then buy a $5 muffler at the hardware store.
72
Posts: 272
Joined: January 23rd, 2008, 3:11 am
Location: Ohio

Post by 72 »

When I did a 6.5 swap, the drivers hubs blew out after about an hour of use (with 12-30 gearing). I ended up putting some 1.5" dia hose clamps around the replacement driver hubs to reinforce the pinned area. Been holding up pretty good so far. Heres a pipe idea. I put a threaded connector about 5" from the end so I can run it with a muffler when needed.

Image
929rog
Posts: 42
Joined: November 4th, 2011, 11:52 am
Location: So. Maine

Post by 929rog »

Thats about what I was talking about for the pipe. Wow 12/30 gearing! How fast? I'm going to guess 25mph?? How does it pull that gear on the trail?
72
Posts: 272
Joined: January 23rd, 2008, 3:11 am
Location: Ohio

Post by 72 »

Does 19 mph (gps) @ 5200 rpms, thats when it starts to float the valves. Its pretty brutal all around, I think it could easily handle another 3 teeth on the clutch, even with the throttle stop set at 3/4. I would like to see someone do a 99cc with a TAV.
MachJeff
Posts: 79
Joined: September 21st, 2005, 4:08 pm
Location: Mb. Canada

Post by MachJeff »

My drivers are really old, so that is a great tip, I will put hose clamps on asap.

Any reason why you ran the exhaust to the front instead of down right beside the chain? In one of my photos above you can see where I already have the hole cut, that was my plan - same as I routed it for the 2hp.

Right now with very little testing, I have the throttle stopped at 3/4, but think I will have to stop it at about 1/2, it's revving higher than I want it to for now. I also still have it geared really low at 12-42, slow for the little ones but I can pull them on a tobboggan.
72
Posts: 272
Joined: January 23rd, 2008, 3:11 am
Location: Ohio

Post by 72 »

I would of rather of put 2 piece clamp collars on the hubs but did not have any of the right size laying around. Sometimes flipping the drivers and track can help with ratcheting. I ran the pipe out the front because it needed to be around 18" long for the ID of pipe I was using (calculated for a stock clone). I'm not using all the engine, so I doubt it really makes that much of a difference now.
Post Reply

Who is online

Users browsing this forum: No registered users and 1 guest