


Kitty Cat Snowmobile Maintenance
 These Kitty Cat snowmobile maintenance procedures are reprinted from an older Arctic Cat parts and service manual. They are good general maintnenace procedures that should pertain to most model years.
They include some common sense items, but also plenty of how-to's for the Kitty Cat sled owner with average mechanical ability. There are some great pointers for off-season storage and start-up after a long summer of rest as well.
As for the ignition and lighting, you can find some electrical tests here. The following information and procedures are copyright Arctic Cat or Artco, depending on the era they were written...
Jump to: Summer Storage | Winter Prep | Lubrication | Brake | Track | Ski
Kitty Cat Maintenance Information
Engine Break-In
The Kitty Cat Snowmobile engine (when new or overhauled) requires a short break-in period (approximately 10 operating hours or two tankfuls of a 24:1 fuel mixture) before being subjected to heavy load conditions or full-throttle operation.
Strict adherence to the break-in procedure will contribute to optimum performance and longevity of the engine.
During break-in, a maximum of 1/2 throttle is recommended; however, brief full-throttle accelerations and variations in driving speeds contribute to good engine break-in.
Recommended Gasoline
The correct gasoline is 88 minimum octane leaded. However certain gasoline must be avoided.
Do not use gasolines containing methanol. Also, gasoline additives, gasohol, and white gas MUST NOT BE USED; they will eventually cause engine damage.
NOTE: Arctco recommends leaded gasoline; however, unleaded gasoline (of at least 88 minimum octane) may be used as a substitute if leaded gasoline is not available.
Recommended Oil
The correct oils to use are Arctco/Arctic Cat 50:1 Oil. These oils are specially formulated to meet the lubrication requirements of the Kitty Cat engine.
Summer Storage
Prior to storing the Kitty Cat for the summer, it is extremely important that it be properly serviced to prevent rusting and component deterioration.
Arctco recommends the following procedure to prepare the snowmobile for summer storage.
- Remove the seat cushion from the tunnel, wash with a damp cloth, and store in a dry place.
- Clean the snowmobile thoroughly by hosing dirt, oil, grass, and other foreign matter from the underframe, tunnel, hood, and belly pan.
- Allow the snowmobile to dry thoroughly. DO NOT get water into any part of the engine.
- Drain all fuel from the fuel tank. Close the fuel shut-of valve by rotating it clockwise; then remove the air intake cover. Start the engine and allow it to idle; then using a rust-preventative oil, rapidly inject the oil into the carburetor air intake for a period of 10 to 20 seconds until all fuel in the carburetor float bowl is used and the engine stops. This pro cedure will coat the crankshaft with a protective coating of oil.
- Install the air intake cover and the fuel tank cap (if it was removed).
- Plug the hole in the muffler with a clean cloth.
- Disconnect the high tension wire from the spark plug; then remove the spark plug. Pour 15 ml (1/2 fl oz) of petroleum-based oil into the spark plug hole; then pull the recoil starter handle slowly about ten times. Install the spark plug and connect the high tension wire.
- Remove the drive chain and clean thoroughly in a solvent. Install drive chain and lubricate with a dry, graphite-based chain lubricant. NOTE: The drive chain is equipped with a master link for servicing.
- Apply a lightweight, petroleum-based oil to the steering post bushings. Check the lubricant level in the gear case and add lubricant if necessary.
- Tighten all screws, nuts, and bolts making sure that all calibrated nuts and bolts are tightened to specifications.
- Make sure all rivets holding components together are tight. Replace all loose rivets.
- Clean and polish the hood, console, and chassis with an automotive-type cleaner wax. DO NOT USE SOLVENTS OR SPRAY CLEANERS. THE PROPELLENT WILL DAMAGE THE FINISH.
- Lightly sand the bottom of the skis; then using black paint p/n 0652-004, paint the entirebottom of the skis.
- If possible, store the Kitty Cat indoors. Raise the rear of the snowmobile off the floor and block up the rear end. Cover the snowmobile with a heavy tarpaulin to protect it from dirt and dust.
- If the Kitty Cat must be stored outdoors, block the entire snowmobile off the ground and cover it with a heavy tarpaulin to protect it from dirt, dust, and rain. NOTE: Avoid using a plastic cover as moisture will collect on the snowmobile causing rusting.
Preparation After Storage
Taking the snowmobile out of summer storage and correctly preparing it for another season will assure many miles and hours of trouble-free snowmobiling. Arctco recommends the following procedure to prepare the snowmobile.
- Clean the snowmobile thoroughly. Polish the exterior of the snowmobile using an automotive-type cleaner wax.
- Clean the engine cooling fins and the recoil starter vents. Remove the cloth from the muffler.
- Check all control wires and cables for signs of wear or fraying. Replace if necessary. Use cable ties or tape to route wires and cables away from hot or rotating parts.
- Inspect the drive chain and drive chain ten-sioner. Replace if necessary.
- Lubricate the drive chain and steering post bushings.
- Check brake-lever travel distance, all controls, ski alignment, track tension, track alignment, brake band, and ski wear-bars; adjust orreplace as necessary.
- Examine the fuel filter and clean or replace if necessary.
- Fill the fuel tank with properly mixed fuel.
- Clean and install the seat cushion.
- Check the spark plug (clean or replace as necessary); then start the engine and ensure proper carburetor adjustments.
Lubrication
The drive chain and steering post bushings must be properly lubricated to ensure efficient operation. Also, the gear case lubricant must be maintained at the proper level.
DRIVE CHAIN
The drive chain should be lubricated every 20 operating hours with a dry, graphite-based chain lubricant. By using a dry, graphite-based chain lubricant, dirt buildup on the drive chain will be minimized. Before each lubrication, inspect the drive chain for dirt accumulation.
To lubricate the drive chain, shut the engine off and wait for all moving parts to stop, remove the drive chain shield, and lubricate the drive chain. After lubricating the drive chain, install the drive chain shield.
If excessive dirt is present on the drive chain, clean using the following procedure:
- Remove the drive chain shield.
- Remove the master link from the drive chain: then remove the chain.
- Wash the drive chain in parts cleaning solvent and dry using compressed air.
- Place the chain into position on the clutch sprocket, loop the chain over the driven sprocket, and install the master link making sure that the clip open end is directed away from the direction of drive chain rotation and that the clip is seated properly.NOTE: Make sure the chain is resting on the chain tensioner and proper chain tension is maintained.
- Lubricate the drive chain with dry, graphite-based chain lubricant.
- Install the drive chain shield.
NOTE: If a dry, graphite-based chain lubricant is not available, lubricate the drive chain with several drops of petroleum-based oil. If the Kitty Cat is operated in the summer with the optional wheel kit, the drive chain should be lubricated more frequently.
STEERING POST BUSHINGS
Apply a lightweight, petroleum-based oil to the upper and lower steering post bushings every 40 operating hours.
GEAR CASE
Every 40 operating hours the lubricant level should be checked in the gear case. To check the lubricant level, remove the oil level screw from the lower side of the gear case.
The lubricant must be at the point of overflowing in the oil level hole. If lubricant is not present, add SAE # 10W-30 through the oil fill hole until it flows out of the oil level hole.

Brake
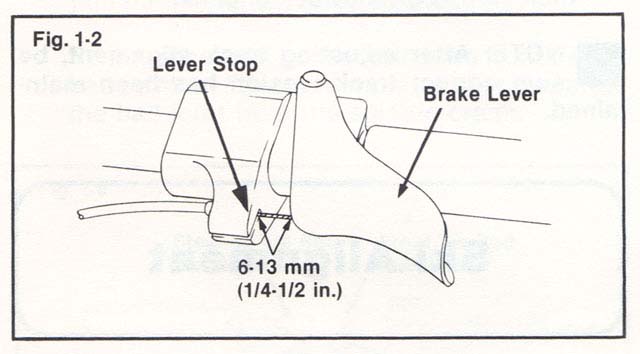
Checking Brake Lever Travel
- Compress the brake lever fully.
- Check the distance between the brake lever and the lever stop. The distance must be within the specified range of 6-13 mm (1/4-1/2 in.).
- If travel distance is not as specified, adjust the brake.
Adjusting Brake Lever Travel
To adjust the brake lever travel, use the following procedure:
- Remove the drive chain shield.
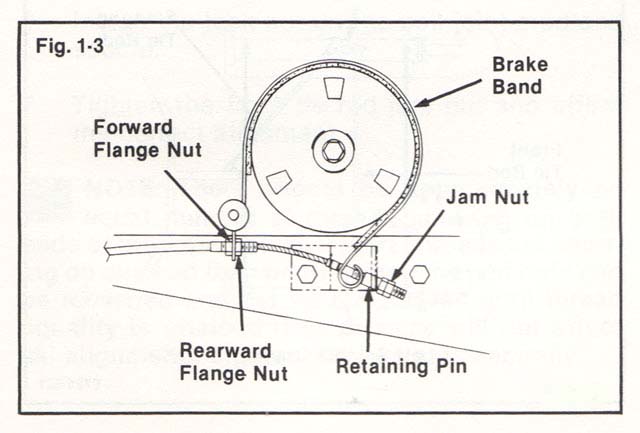
- Loosen the jam nut on the retaining pin; then tighten the retaining pin to set up the brake.
- Check the brake lever travel distance periodically while tightening the retaining pin. When the distance is within the specified range of 6-13 mm (1/4-1/2 in.), tighten the jam nut on the retaining pin to secure the adjustment.
NOTE: The brake band should lock tightly when the brake lever is compressed and should disengage when the lever is released. If additional adjustment is necessary, use the following steps.
- Loosen the rearward flange nut on the brake cable.
- Tighten the forward flange nut to set up the brake.
- Ensure correct brake lever travel distance; then tighten the rearward flange nut to secure the adjustment.
'77 - '99 OEM Brakes/Cable/Levers → '72, '73, '74, '75, '76 brake band, cables, and levers xref to 1977 or newer part #s
Track Tension
NOTE: Track tension and track alignment are interrelated; therefore, always check both, even if only one adjustment seems necessary.
Track tension is directly related to the overall performance of the snowmobile. If the track is too loose, it may slap against the tunnel causing wear, or it may ratchet on the track drive sprockets.
If the track is too tight, track drive sprocket wear will result. In addition, a track that has improper tension will prevent the snowmobile from reaching optimum performance.
Checking Track Tension
WARNING DO NOT attempt to check or adjust track tension with engine running. Turn ignition key to the OFF position. Personal injury could result from contact with a rotating track.
Before checking track tension, remove excess ice and snow buildup from the track and from the track drive sprockets. Raise the rear of the snowmobile off the floor making sure the track is not contacting the floor.
Exert moderate downward pressure at mid-span of the lower track section. Measure the distance between the bottom of the rear bogie wheels and the inside surface of the track. The measurement must be within a range of 20-25mm (3/4 - 1 in.). If the measurement is not as specified, an adjustment is necessary.
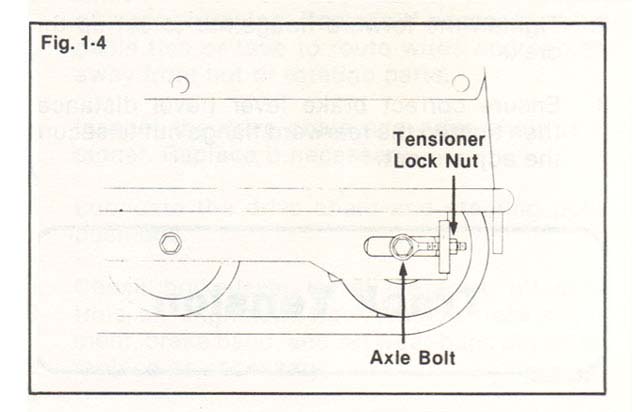
Adjusting Track Tension
- Loosen the axle bolts on both ends of the axle.
- Adjust the tensioner lock nuts on both sides of the track until the proper track tension is attained. Make sure to adjust both lock nuts equally.
- When track tension is correct, tighten axle bolts to 2.8-3.3 kg-m (20-24 ft-lb).
Track Alignment
Proper track alignment is obtained when the rear track drive sprockets are centered in the track cutouts. If the track runs to the right or left of center, an adjustment is necessary.
Adjusting Track Alignment
- Before adjusting track alignment, remove excess ice and snow buildup from the track and track drive sprockets.
- Raise the rear of the snowmobile off the floor making sure the track is free to rotate.
- If the track runs to the right, loosen the right side axle bolt and tighten the right side tensioner lock nut one revolution. If the track runs to the left, loosen the left side axle bolt and tighten the left-side tensioner lock nut one revolution.
- Start the engine and accelerate only enough to rotate the track several revolutions. SHUT ENGINE OFF Note: Allow the track to coast to a stop. DO NOT apply the brake because it could produce an inaccurate track alignment condition.
- When the track stops rotating, check the track alignment and continue adjusting until proper alignment is attained.
- Tighten the axle bolt to 2.8-3.3 kg-m (20-24 ft-lb).,/li>
- Field test the track under actual conditions; then verify correct track alignment. NOTE: After adjusting track alignment, be sure correct track tension has been maintained.
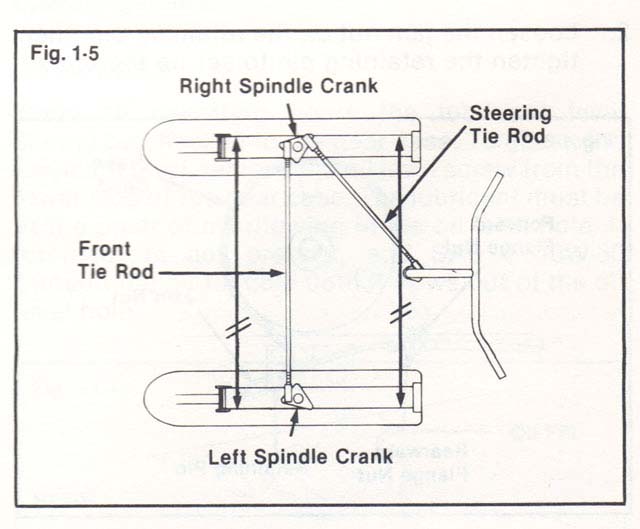
Ski Alignment
Checking Ski Alignment
- Turn the handlebar to the straight-ahead position.
- Measure the distances to the outside edges of the leaf springs. Make sure the measurem�ents are taken behind the front mount bracket and ahead of the rear mount bracket. NOTE: Ski alignment is correct when the skis are parallel to each other (equal measurements front and rear) or when the skis have a maximum of 6 mm (1/4 in.) "toe out" (front measurement 6 mm (1/4 in.) more than rear measurement).
- If ski alignment is not as specified, the snowmobile will have a tendency to wander and may be difficult to control; therefore, an adjustment is necessary.
Adjusting Ski Alignment
- Make sure the ignition key is in the OFF position.
- Visually examine to determine which ski is out of alignment with respect to the handle bar; then make adjustment to that ski.
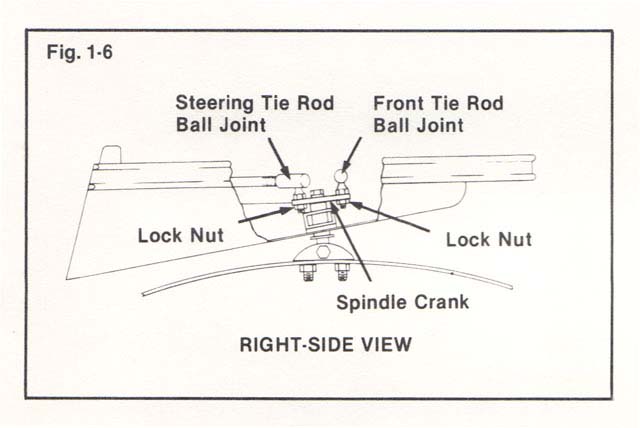
- Open the hood and loosen the front tie rod jam nut of the ski to be aligned.
- Remove the lock nut securing the front tie rod ball joint to the spindle crank; then separate the ball joint from the spindle crank.
- Align the ski; then rotate the ball joint until the ball joint stud aligns with the hole in the spindle crank and insert the ball joint stud into the spindle crank.
- Install the lock nut on the ball joint stud and secure.
- Tighten the front tie rod jam nut and affirm the correct alignment.
NOTE: There should be approximately an equal number of threads showing on both ends of the front tie rod. If more threads are showing on one end than on the other, the jam nuts can be loosened and the tie rod rotated until thread equality is attained (this process will not affect ski alignment). Tighten the jam nuts securely.
Steering Alignment
Visually examine the steering alignment by placing the handlebar in the straight-ahead position and checking to be sure the skis are pointing straight ahead. If the skis are not pointing straight ahead, adjust using the following procedure:
- Open the hood and loosen the steering tie rod jam nut.
- Remove the lock nut securing the steering tie rod ball joint to the spindle crank. Separate the steering tie rod and ball joint from the spindle crank.
- Place the handlebar and skis in the straight-ahead position.
- Rotate the ball joint until the ball joint stud aligns with the hole in the spindle crank; then secure the ball joint to spindle crank with the lock nut. NOTE: There should be approximately an equal number of threads showing on both ends of the steering tie rod. If more threads are showing on one end than on the other, the jam nuts can be loosened and the tie rod rotated until thread equally is attained (this process will not affect steering alignment). Tighten the jam nuts securely.
- Tighten the steering tie rod jam nut.
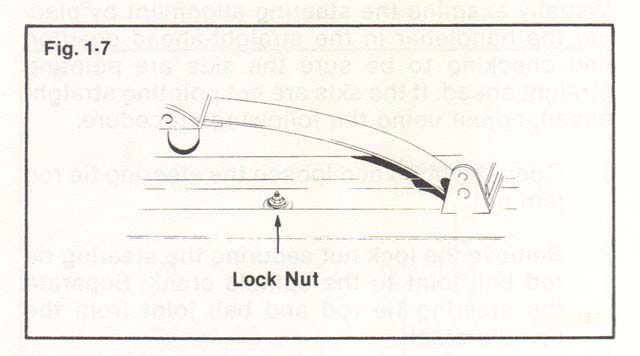
Ski Wear-Bar
The ski wear-bar is a replaceable bar attached to the underside of the ski. The purpose of the wear-bar is to assist in turning the snowmobile, to minimize ski wear, and to maintain good steering control.
If the snowmobile is operated primarily in deep snow, ski wear-bar wear will be minimal; however, if the snowmobile is operated on terrain where the snow cover is minimal, the ski wear-bar will wear faster.
Removing Ski Wear-Bar (Skag)
- Remove ice and snow buildup from the ski.
- With the fuel tank nearly empty (less than 1/4 full), lay the snowmobile on its side. A piece of cardboard should be used to protect the finish on the hood.
- Remove the lock nut and washer securing the wear-bar to the ski.
- Either pry or pull the center of the wear-bar away from the ski until the wear-bar bolt is clear of the ski; then slide the wear-bar forward as far as possible and pull the rear of the wear-bar from the hole in the rear of the ski.
- Remove the wear-bar from the hole in the front of the ski.
Installing Ski Wear-Bar (Skag)
- Insert the front of the wear-bar into the hole at the front of the ski and swing the wear-bar rearward. WARNING DO NOT bend the ski wear-bar excessively when installing. Excessive bending of the ski wear-bar may cause premature wear, breakage, and possible injury.
- Slide the wear-bar rearward until it is possible to insert the rear of the wear-bar into the hole at the rear of the ski.
- Center the wear-bar bolt in its hole and install the washer and lock nut.
- Tighten lock nut securely.
Latest from KCS...
There's no time like the present to track down parts, restore, and rebuild your snow machine, even the big boys need their sleds to be trail worthy.
We also offer easy access to snowmahine parts for all the manufacturers including Polaris, Skidoo, and Yamaha snowmobiles.
There's also brand name boots, gloves, jackets,
,
and
and more snow riding stuff available from our sponsors.
Elsewhere in Snowmobiling...
- Upcoming Snow Shows... There are quite a few, even in the warmer months Snowmobile Shows scheduled for this year. Vintage snowmobiling is alive and well, check for an event near you...
- Restoring a Vintage Polaris? There's plenty of Vintage Polaris restorations to check out, also they specialize in "old-school" Polaris sled parts...
- Calling Wisconsin Snowmobiliers! Wisconsin Clubs Wisconsin offers the finest snowmobile trail systems in the country, these trails are maintained by volunteers who are members of the local snowmobile clubs. Join a club today...
- It's not "snow time" yet... National Snowstorm Forecast Keep watching the weather and stay tuned for the Farmer's Almanac and the snowfall prediction for the winter of 2023/2024.